HOW TO INSTALL CABLE RAILING
Cable Railing The RailEasy™ Way!
This page will guide you through the proper design and installation of the RailEasy™ Cable Railing System. You will require only a few parts and simple hand tools to complete a beautiful cable railing project.
Always refer to your local building code officials prior to installing any Atlantis Rail system to ensure all code and safety requirements are met. Atlantis Rail Systems is not responsible for improper or non-recommended installations.
CABLE RAILING TOOLS FOR THE DO-IT-YOURSELF INSTALL
- RailEasy™ Drilling Template (accurate drilling guide)
- 3/8″ Wrench for holding the threaded stud
- 7/16″ Wrench for releasing lock nut and turning cone onto stud
- 5/16″ Wrench for tensioning body
- 1/8″ Drill Bit for drilling tensioner screw holes, and rail side mount screw holes
- 7/32″ x 5-1/2 ” Drill Bit for drilling mid post through-holes
- #2 Stainless Steel square head driver bits for mounting screws
RECOMMENDED PRODUCTS
RailEasy™ Drilling Template
The RailEasy™ Drilling Template allows for an easy installation of a cable railing system.
RailEasy™ Installation Tools
The RailEasy™ Installation Tools are essential when installing a cable railing system.
CABLE RAILING SPACING
Our standard cable spacing is 3″ on-center running the length of each post. Cable railing requires support (mid posts) every 4 feet to maintain cable spans with minimum deflection. If you wish to maintain 3″ spacing for cable sections that span over 4 feet (max. 7 feet), we offer cable stabilizer kits. Atlantis Rail has independent test results showing that the RailEasy™ Cable Railing System meets and exceeds the requirements of the International Building Code and International Residential Code at post spacing up to 4 feet. Any variance from our recommendations should be discussed with your building inspector before proceeding with a project. Post spacing over 4 feet is done at your own risk.
To calculate your cable requirement you must measure from the top of your deck or bottom rail to the bottom of your top rail, then divide that number by the cable spacing (3″) and subtract 1. Example: 30 inches between deck and top rail: 30 / 3 =10 and 10-1= 9. The requirement is 9 runs of cable.
CABLE RAILING SPECIFICATIONS
We recommend and sell only 1×19 construction, and only type 316L (marine grade) stainless steel cable. We use a standard diameter 5/32″ cable. Cable for railing applications come in four basic diameters and two potential constructions. The basic diameters are 1/8″, 5/32″, 3/16″, and 1/4″. For cable railings, you want to use a construction that is rigid as possible and will not stretch.
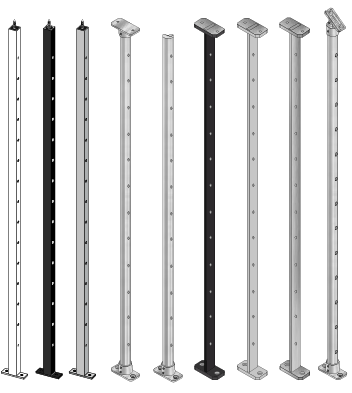
CABLE RAILING POST PLANNING AND INSTALLATION
You will be working with three types of posts; end posts, used at each starting or ending point, corner posts, used at every change of direction, and mid posts, used to support rails and cable between end and corner posts.
CABLE RAILING END POSTS AND CORNER POSTS
The attachment of the post to the decking is extremely important. Check local code requirements. Most municipal building departments provide specific drawings and examples of preferred post attachment methods. Substantial end and corner post are always necessary to prevent the posts from bending under the cable tension. If post material is not strong enough to withstand tension, it may cause the post to bow and the cables to sag. A minimum 4×4 (3-1/2 ” square) post is required.
CABLE RAILING MID POST
Cable railing requires support (mid posts) every 4 feet to maintain cable spans with minimum deflection. If you wish to maintain 3″ spacing for cable sections that span over 4 feet (max. 7 feet), we offer cable stabilizer kits. Atlantis Rail has independent test results showing that the RailEasy™ Cable Railing System meets and exceeds the requirements of the International Building Code and International Residential Code at post spacing up to 4 feet. Any variance from our recommendations should be discussed with your building inspector before proceeding with a project. Post spacing over 4 feet is done at your own risk.
CABLE RAILING – CABLE STABILIZER KITS
This is not a mid post! It is specifically for use where post to post measurements span over 4 feet (max. 7 feet). It adapts longer spans to code compliance by stabilizing the deflection of cable between posts. The Cable Stabilizer Kits are available for straight or stair sections. Stainless steel versions are 42” long, 1” round stainless steel tube and pre-drilled at 3” intervals for cable to pass through. The stair stabilizer is slotted to work with stair angles between 32 and 38 degrees. Budget stabilizers are available in Aluminum coated black, bronze, metallic silver or white and require grommets. In most cases, the stabilizers must be field cut at both ends for an accurate fit into your system. If you are using the cable stabilizer to run longer than recommended lengths you must be sure to discuss this with you building inspector before proceeding. The Cable Stabilizer Kits cannot be used to replace the use of substantial mid posts and should never be used in spans over 7 feet.
ADDING THE RAILS
A top rail is always necessary when building a cable railing system.
The top rail should always be installed in a way that allows the top rail to absorb and deflect the pressure applied when cable is tensioned. It is a best practice to secure the top rail between the posts rather than simply placing the rail on top of the posts.
Bottom rails add support to any railing system and it allows for a foot rest when leaning on the railing.
CABLE RAILING HARDWARE SELECTION
Our cable railing hardware is designed to be used with only 5/32″, 1×19 cable. All of our cable railing attachments use the same patented RailEasy™ mechanical crimping technology to securely fasten the cable. The RailEasy™ cable attachment utilizes an wedge that slides through the hole in the tensioner cone and crimps the cable in place.
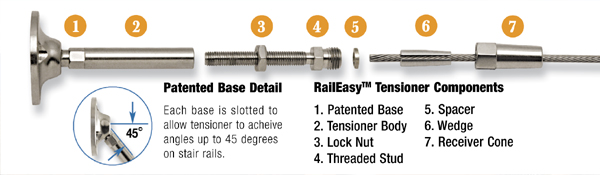
RAILEASY™ TENSIONER
The RailEasy™ Tensioner is our primary cable railing tensioning/fastening device. It features mechanical swaging capabilities that allow installers to cut cable on-site, removing the hassle of pre-measuring and the cost of miscalculating dimensions. Each tensioner is made up of durable, corrosion resistant marine grade stainless steel.
Once the complete RailEasy™ Tensioner is mounted on your post, the cable is inserted inside the Receiver Cone (7) and Wedge (6) approximately 1/8” past the bottom edge of the wedge to accommodate the Spacer (5). The cone is tightened onto the Threaded Stud which forces the wedge to push through the cone and bite into the cable as it is tightened.
RECOMMENDED PRODUCTS
RailEasy™ Cable Railing Tensioner
The RailEasy™ Tensioner is the primary cable railing tensioning/fastening device.
RAILEASY™ SWIVEL END (NON-TENSIONING, REQUIRES A RAILEASY™ TENSIONER AT THE OPPOSITE END)
The RailEasy™ Swivel End is designed for use in short runs less than 25 feet. It must always be used with a RailEasy™ Tensioner at the opposite end of the cable run for tensioning capabilities. The compression fitting holds the cable using simple hand tools and the slotted base allows for angles up to 45 degrees, making it ideal for stair applications. The swivel ends are surface mounted with three #8 1-1/2″ stainless steel screws.
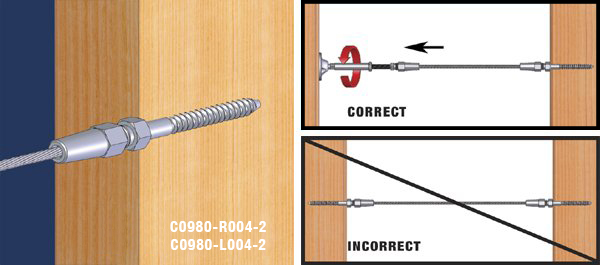
RAILEASY™ LAG STUD (NON-TENSIONING, REQUIRES A RAILEASY™ TENSIONING DEVICE AT THE OPPOSITE END)
The RailEasy™ Lag Stud is designed for use in short runs and must always be used with a RailEasy™ tensioning device at the opposite end of a cable run for tensioning capabilities. These fittings are made from marine grade stainless steel and are available in right hand and left hand thread 2 packs. The compression fitting holds the cable using simple hand tools. Holes must be pre-drilled before installing RailEasy™ Lag Studs.
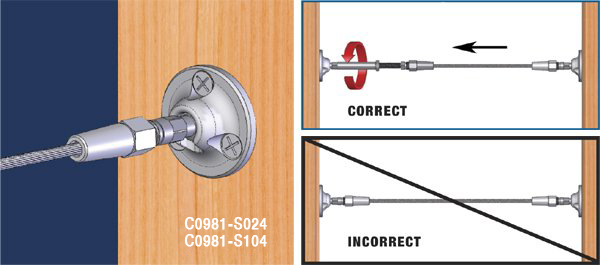
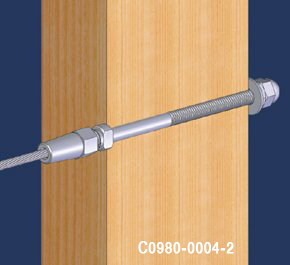
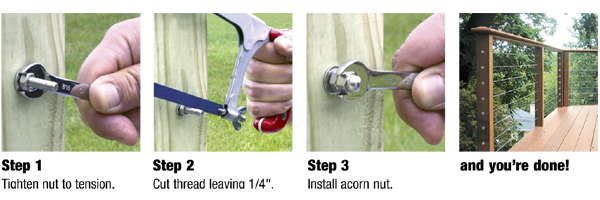
RAILEASY™ STUD ASSEMBLY
The RailEasy™ Stud Assembly is used for cable railing applications where a “through-post” look is desired. It is made from marine grade stainless steel for maximum durability and corrosion resistance and has a compression fitting for quick and easy installation. The assembly is used on straight and angled (Stair Spacers are available for angles) runs by drilling through the post and fixing it to the back side. Tighten the locking nut to tension and cut off the excess thread to fit the acorn nut. Stainless steel and HandiSwage™ Cover Nut Sets are available.
RAILEASY™ CABLE SLEEVES
The RailEasy™ Cable Sleeve is designed to protect your wood posts from chafing and incidental damage from cables rubbing around the outside of your mid post cable holes. It can also be used to accommodate angles up to 90 degrees (must be double posted) and stairways coming off a straight run. The cable sleeves are made from marine grade, type 316L, stainless steel for maximum durability and corrosion resistance. The cable sleeves are available with a countersunk or flush face. To install, drill a 1/4″ hole and tap in the cable sleeve for a snug fit.

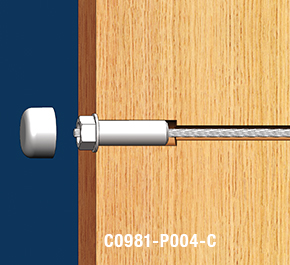
RAILEASY™ FLUSH FITTING (NON-TENSIONING, REQUIRES A RAILEASY™ TENSIONING DEVICE AT THE OPPOSITE END)
The RailEasy™ Flush Fitting is perfect for architectural cable railing applications where “through post” hardware is desired. These fittings feature a self-locking mechanism that holds the cable in place. The RailEasy™ Flush Fitting is a fixed termination point and must be used in conjunction with a RailEasy™ tensioning device at the opposite end of each cable run. Affix a Deluxe or HandiSwage™ Cover Nut Set (sold separately) to the end for a finished look.
CUTTING YOUR CABLE
Cable should be cut only after you have all of your post, rails, tensioners and other cable railing components in place. Generally, we advise that you string one run of cable in a given cable section and fasten it into the tensioner and then pull the cable tight against the tensioner or fitting at the opposite end. Once pulled tight to a position approximately at the bottom of the opposite cone you can cut the cable and remove it by pulling back through your post and undoing the tensioner stud where the cable was connected and lay it out on the deck. Now remove the next tensioner stud in the series and connect a new cable run to it and have an assistant hold them even while you un-spool the cable to match the length. Cut the next cable and all subsequent cable for that same run to the same length. Once all cables are cut, pull them through all of the mid posts to the opposite end and put the tensioner studs back in where removed. Now you are ready to insert the cable into the far cones and fasten the cable for tensioning.
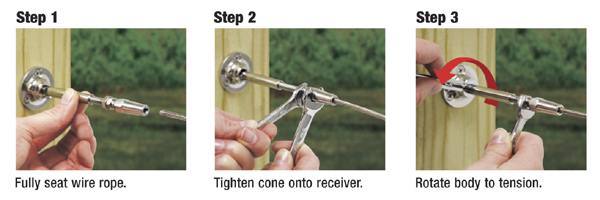
TENSIONING A CABLE RAILING
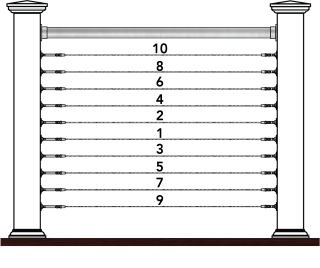
Now you are ready to complete your installation by tensioning your cables. Simply follow the directions and make sure to follow the proper tensioning sequence per the diagram.
TENSIONING SEQUENCE DIAGRAM
COMPLETING YOUR CABLE RAILING PROJECT
You may need to tension your cables a second time depending on what type of railing material and design you used, but once you have your cable tensioned to the desired tightness you should clean all components with a chloride-free cleanser (car wash liquid is perfect) and if near salt water, you should use a passivating fluid, available through Atlantis Rail. The passivating fluid does an excellent job of removing any potential iron deposits left from tools during installation. Please read the Stainless Steel Rail Care Guide for further maintenance details.